


External Hard-drives are portable storage devices connected with a system via a wired USB cord or a wireless connection. External hard drives are trendy among users due to their versatility made possible by their high storage capacity. External hard-drives’ portability is overwhelming, which makes them one of the most commonly bought complimentary components along with a computer.
On the latest version of Microsoft Windows, working an External Hard Drive is as easy as switching on or off a light. Just plug it in via the USB and remove it after finishing up your work. The computer system automatically detects the device upon connection and provides a stable platform to perform multiple tasks.
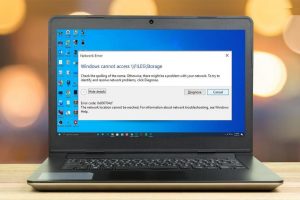
Sometimes, the system automatically can’t detect this connection, and this is where the problem begins. It becomes very irritating after a point of time for users when External Hard Drive Not Showing Up on Windows or File Explorer as usual.
How to Fix External Hard Drive Not Showing Up on Windows 10
There are numerous ways to Fix External Hard Drive not showing up the problem in Windows 10. The most efficient and straightforward fixes have been discussed in this guide in detail. The users reading this guide will be able to fix the issue in a couple of minutes.
Let us begin with the most basic fixes of all time and gradually climb up the ladder if the problem persists. Before going through all the holes, be sure to do the following to solve External Hard Drive Not Showing Up.
- Plug the USB via different ports to ensure that the ports are not defective themselves.
- Ensure that the USB cable is working correctly and is not damaged in any way.
- Check the hard-drive for physical damage and ensure that it is in good condition.
Solution 1: Performing Basic Troubleshooting Tasks
Troubleshooting is the easiest and one of the most basic ways to fix an issue that plagues the system. This includes the user reporting the problem to the system’s troubleshooter, which then analyzes the case and finds out some solution depending on the issue’s type. This is usually done via elimination, where the troubleshooter resolves the problem by following a set of rules.
Follow these steps given below to use the troubleshooter to fix this issue:
- Press the “Windows key + I” to bring up the Settings.
- Go to the “Update & Security” tab.
- Click on “Troubleshoot” from the left panel.
- Under the Hardware and Devices option, run the troubleshooter.
- Complete the process and restart the system upon completion.
If the system manages to find or detect any underlying issue, it will automatically fix it for the user.
Solution 2: Updating Hard Drive Drivers
Out-dated or expired hard-drive drivers might cause the problem of no detection. This is usually because the system cannot interact with the external hard-drive interface that allows interaction. Hence, the only way to fix this is to update the drivers to ensure that this is not the case.
Follow the given steps to update the drivers in no time at all successfully.
- Move to the Start menu and search for “Device Manager,” and open it.
- Scroll down to the Storage Controllers tab and click on the drop-down list.
- Right-click on the show device and press on “Update Driver. “
- The update can be done via automatically searching the internet for the latest updates or browsing the local computer files for pre-downloaded versions of the newest update.
Restart the computer after the updates have been applied. This would solve the problem if the root of the issue were out-dated driver software.
Solution 3: Uninstalling The Drivers
Sometimes, the downloaded driver software might become corrupt and, in the process, might become unreadable by the system’s processor. This will hinder the normal function of the disk drive readers. To solve this problem, all we have to do is uninstall the drivers and re-install them with the correct configuration at default settings. To do this, follow these given step:
- Move to the Start menu and search for “Device Manager,” and open it.
- Please scroll down to the Disk Drives tab and then double click on it to show the available devices.
- Right-click on the device which is showing an error and click on “Uninstall. “
- Then, expand the Universal Serial Bus controller tab and then double click on it to show the list. Select the Driver and right-click on it, and then press the “Uninstall” button.
- Finally, right-click on the Device Manager window’s space and select “Scan for hardware changes. “This will automatically detect the uninstalled packages and re-install them correctly.
- Restart the computer.
This solution will indeed work out if corrupt disk drive files had caused the problem.
Solution 4: Changing Drive Letter
There are inbuilt drivers on the system that are allocated memory space, and they are identified by various letters. These letters determine the path of the memory usage upon which these drives are executed.
Sometimes, if two drives share the same letter, this might lead to undesirable conflict between the system’s memory allocator. This problem should be fixed immediately to prevent any future abnormalities.
Follow the given steps to change the letter of the drive.
- Press the Windows key + X buttons to bring up the Quick Access Menu.
- Pick the Disk Management option from the list.
- Locate the desired portable hard-drive and right-click on it.
- Choose the “Change Drive Letter and Paths. “
- A window appears showing the current letter of the drive.
- To change it, click on the “Change” button and select a new letter for it. Be sure to choose a unique note.
- Choose Yes when the confirmation dialogue box prompts up.
- Restart the computer.
Solution 5: Enabling Hidden or Empty Drives
Many systems have empty folders or drives set to hidden by default to prevent unnecessary clattering of icons on the screen. This might be an underlying problem that hides driver icons from the Windows Explorer menu, and hence users cannot find their external hard-drive icons.
This fix is very common to unhide folders and empty drivers. It is recommended that users remember this method for further reference to other errors too. This fix is just also handy and useful to be unaware of. Please do the following steps to unhide all empty folders and empty drives and make them visible once and for all.
Solution 5.1: File Explorer
- Move to the Start menu and search for “File Explorer,” and open it.
- On the top right side, look for the File tab and left-click on it.
- Select the “Change folder and search options. “
- Head to the View tab and look under the Advanced Settings.
- Uncheck the option to “Don’t show hidden files, folders, or drives” and check the opportunity to “Show hidden files, folders, or drives. “
- Click on “Apply” and then OK.
- Restart the computer, preferably.
Solution 5.2: Device Manager
- Move to the Start menu & search for “Device Manager,” and open it.
- Click on the View tab and check the option for “Show hidden devices. “
- Check for the external drive under Disk drives for accessibility.
- Restart the computer if it appears.
This should solve hidden folders and drives and allow the user to access the desired drives without any problem.
Solution 6: Allocating New Volume to Hard Drive
A computer system describes any physical space on a hard-drive that belongs to a partition as allocated. When setting up a new hard-drive or any device, the system installation will automatically assign drive space to that device. But sometimes, if this particular step fails to self-execute, the drive or device might remain unallocated, and hence the system will not read the device.
This is where the proper allocation of space comes into play. Sometimes, formatting drives carelessly without allocating parameters will also lead to this error. In this solution, the external drive will be assigned a new volume on the system. Follow the steps given below:
Note: Previous data present on the external drive will be formatted and might not be recoverable.
- Press the Windows key + X buttons to bring up the Quick Access Menu.
- Pick the Disk Management option from the list.
- After opening the disk management window, there are uneven blue and black coloured strips present over the system’s HDD volumes. The blue coloured ribbon indicates space that has been already allocated, and the black colour shows the unallocated or the unused space.
- Right-click over the unallocated space & select “New Simple Volume. “
- An installation wizard screen will open up that will guide you through the whole process.
- The wizard will ask for modifications regarding the size allocation and the drive’s letter to be allocated.
- The default numbers and letters should be sufficient as the system calculates the necessary space required for the drive and allocates it accordingly.
- Click on Next and go to the screen where there is the option to quick format the drive. Check the box next to the “Perform a quick format” option to enable the industry’s formatting feature.
Note: Quick format will erase all data.
Finish the wizard, and the drive will be allocated new space on the system and a unique drive letter.
This should solve any problem regarding the allocation of space and allow the drive’s normal usage via the system’s disk drive readers.
Solution 7: Make Sure The Drive is Enabled
Enabling the drive is the next step to ensure that the industry runs after creating the new allocation space. So basically, follow this step after completing the solution given above, i.e., solution 6.
- Press the Windows key + X buttons to bring up the Quick Access Menu.
- Select the Disk Management option from the list.
- Look for the newly allocated drive on the bottom left panel of
- Right-click on the external drive and check the status.
- If the status is turned offline, click on the “Online” button to turn it online for the system’s disk drivers to read it correctly.
- This will make the drive available for use on the File Explorer window.
This particular solution is specifically done after allocating new volume space for the external drive to ensure it is in the online state.
Also, Check :
Final Words of External Hard Drive Not Showing Up :
This particular disk reading error is very frustrating to people who are unaware of basic technical knowledge. This guide, External Hard Drive Not Showing Up, will impart that knowledge to those people and fix this error once and for all. Even technicians that are veteran to this field might need this guide as a gateway to come back to the basics. These things are straightforward, and yet people tend to forget them.