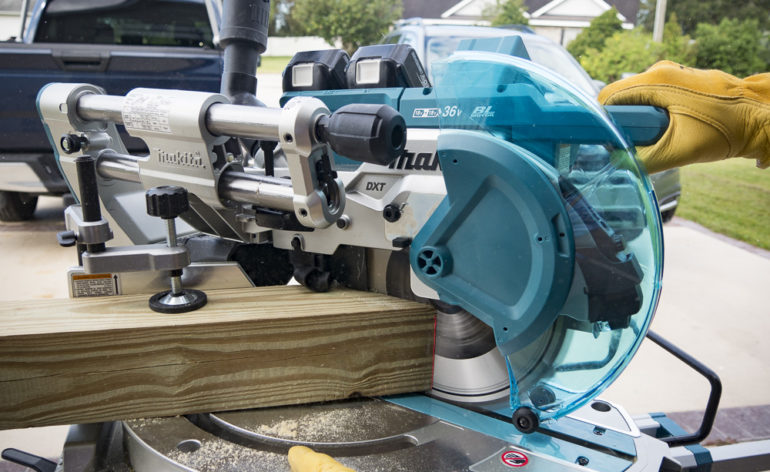
If you’re a DIY enthusiast or have a fully functional workshop, then you must have heard about the miter saws. These are valuable tools for trimming and framing due to their ability to quickly cut molds, window casing, and diverse types of frames.
Miter saws are generally used to make miter cuts and crosscuts in a workpiece. They come with a wide range of features and the ability to handle several complex projects.
However, when it comes to buying one, you need to know some details about the miter saws that will help you to decide which one is the right miter saw that fits your work.
There are many types of miter saws that offer different kinds of cutting levels, functionality, and ascending level. Knowing about these features will help you to buy the best one for your workshop.
Primary Miter Saws
The primary or standard miter saws are the most basic models that offer a straight cut from a variety of angles. You can use them for basic crosscuts and miter cuts, but they can cut at least 45° and 90° angles.
The primary miter saws are perfect tools for simple carpentry work, cuts for picture frames, and some simple DIY projects. Depending on the blade size, the cutting size will vary.
As these miter saws don’t handle complex projects and cannot be adjusted for wide lumber, they can be appropriate for use by the beginners.
Compound miter saws allow you to achieve beveled cuts, thanks to their ability to tilt the blade head at a specific variety of angles.
While individual models generally allow one direction cut, dual bevels can tilt in both directions. It’s better to get the double bevels if you don’t want to reposition your workpiece every time you cut anything.
Based on the features, compound miter saws come in two varieties.
Sliding Compound Miter Saws
This miter saw allows you to move the saw head back and forth, thanks to their radial arm saw the feature. You will be able to cut a broader range of larger workpieces.
Dual Compound Miter Saws
A dual compound miter saw is quite useful when it comes to handling decorative trim work.
The miter saw lets its head rotate on the right and left hand of the saw, which means that you don’t need to flip the board if you want to cut the same angle on the other side of a particular workpiece.
Before you start working with a miter saw, it’s crucial to know about all of its major parts. A miter saw generally consists of a blade, guard, table, power switch, etc.
-
Blade
The blade is an essential part of a miter saw as it’s responsible for all the cutting works. Since it represents the cutting capacity of a miter saw, the size of the material you can cut depends on the size of the blade.
Although most of the blades are around 5-7 inches, some professional contractors use a sizable 12-inch blade.
-
Guard
The guard is another important part that protects both you and the blade. It’s fitted around the blade, covering its whole top half.
It’s top half cannot be moved, but the bottom is attached to a hinge. When you lower the blade down, the hinge swings open.
-
Handle/Power Switch
Most miter saws come with a power switch integrated into the handle that allows you to power the saw while holding the handle to lower it down.
It doesn’t only give you total control but can also protect you from any accident as it stops automatically when you let off the power trigger.
-
Table
The large flat portion to which the miter saw is attached is known as the table. It can work as a base for the saw and your workspace simultaneously.
-
Fence
The fence is a flat, sturdy surface that is mounted directly on the table. It runs perpendicular to the miter saw’s 90° position to keep your workpiece stable.
-
Vise
Most miter saws these days come with a vise grip on at least one side of them. It lets you stabilize the saw on the surface. It is also an excellent option to hold longer workpieces into place.
-
Scale
A miter saw’s scale determines the angle you are cutting your workpiece at. It rotates with the saw as you turn it, pointing to what degree you’re at.
Things to Consider Before Using a Miter Saw
While miter saw can be used for various purposes, there are some points you should keep in mind when using it. They are vital for making sure you don’t get injured while using the miter saw.
Thoroughly Check The Throat Plate
You will find the throat plate below the table in some miter saws. Check if the plate is in level with the table. Doing so will not only prevent the wooden pieces from bending but will also save you from accidents.
Don’t forget to place a ledge beneath the plate if you find its position too low to work correctly.
Opt for a Hold-Down
While cutting your workpiece, you need to secure the clamp to prevent it from getting ruined. That’s why you need a flat surface below the table.
Using a hold-down can aid you in holding your workpiece in place. Make sure it is sturdy so that you can cut the pieces accurately.
Make a V-Shaped Cradle
When the blade hits the dowel stock, the shred of woods may fly towards you. Using a v-shaped cradle can prevent the wood from shredding, thus saving you from a severe accident.
Before you use the miter saw, consider making a wooden v-block and use it to cut the dowel.
Final Thoughts
Miter saws are quite useful tools and perfect for some specific cuts and sizes. These types of devices are often needed when someone is doing woodwork at their workshop or any contraction related work at home.
No matter how professional woodworker you are, you always need the right instrument to do your work efficiently. Purchasing a miter saw can help you in both wood crafting and contracting use.
Before you buy a miter, saw, learn about its types, parts, uses, and safety precautions to avoid any inconvenience in the future.


